In this post we will play around with branches and understand how SmartGit displays version information in the Log window. It is a prerequisite that you have followed all the steps mentioned in my previous post titled ‘Github and SmartGit’
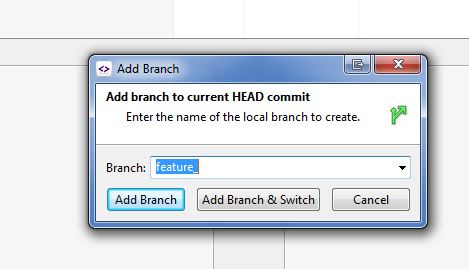
1. Click on ‘Branch –> Add Branch’. Enter a new branch name ‘feature’. Click the button ‘Add branch and switch’
2. Now proceed to make changes in the file GitTestMain.java. As soon as you make any change you will see that SmartGit will highlight the file in red.

3. Now commit the file by selecting the GitTestMain.java file and clicking the commit button. You will see in the ‘Changes’ pane SmartGit will display the change that been done. Enter a comment and click on ‘Commit’. As soon as the Commit button is clicked you will see that the GitTestMain.java file is no longer displayed in the ‘Files’ pane.

4. In the bottom left is a ‘Pushable Commits’ window. Right click on it and select ‘Push Commits’. A dialog box will pop up. Click Push.

5. Open a browser and go to your github repository created in the previous post (In our example, https://github.com/salilsurendran/personal) and click on the branch drop down. You will see two branches one ‘master’ and another named ‘feature’. This is because the commit we made in step 3 has been pushed to the remote repo in step 4.

6. Now lets go back to SmartGit and look at the ‘Log’ window. Press ‘Ctrl + 1’ or click on the 3rd last button from the right on the toolbar just below the ‘Main’ button. This will show all unchanged files in the ‘Files’ pane. Select GitTestMain.java and click on the ‘Log’ button in the top toolbar to bring up the ‘Log’ window. Here you will see two lines and the first line will be ‘feature’ with a green triangle besides it which denotes that this is our current branch. Below that will be the master branch. In the ‘Changes’ pane it will show the latest change that has been made in the feature branch.

7. Switch back to the master branch. Click on the ‘Switch’ icon on the tool bar. In the dialog box that pops up select ‘master’ and click ‘Switch’.

8. Now go back to GitTestMain.java and you will see that the change you had made in the feature branch has disappeared because SmartGit has replaced the file with the one in the master branch which is the branch we switched to in step 7. Don’t worry the changes made in the feature branch is safe in the remote repo. In Git, we can switch between branches with ease in the same working directory without the worry of overwriting changes made in the current branch. If there are some conflicting changes then SmartGit will not let you switch.
9. Now add another line in GitTestMain.java distinctly different from what was done in the feature branch. Go to SmartGit and once again you will GitTestMain.java will be highlighted in red denoting that the file has been changed. Select the file and click ‘Commit’ on the toolbar. A commit dialog will popup and enter a comment. These are the same steps as step 2 and 3 except at this time you will click on ‘Commit and Push’

10. Press ‘Ctrl+1’ to make GitTestMain.java visible again if not already visible. Select GitTestMain.java in the ‘Files’ pane and click on the ‘Log’ button. You will now see the change that has just been committed.

11. Now lets merge the changes from the feature branch into master branch. Click on the ‘Merge’ button in the toolbar. You will a ‘Merge’ window popup. In the ‘Branches’ drop down on the right of the dialog select ‘feature’ and you will see the screenshot below. The green triangle shows you were your current working tree is pointed to which is ‘master’ the current branch you are working on. Right below that line is the ‘feature’ branch and you will notice that graph is diverted there, which means that there are changes in the feature branch that isn’t present in the master branch. This is where we want to merge from.

12. Select the feature branch and click the ‘Merge’ button below. You will get a dialog box saying ‘Merge failed’. This is because there are changes in the feature branch that conflict with the ones in the master branch and these need to be resolved. In the ‘Changes’ pane it will have conflict marked with ‘HEAD’ and the branch that you are merging with ‘origin/feature’. You can resolve this using a text editor or SmartGit’s conflict resolver.

13. Right click on GitTestMain.java and select ‘Conflict Resolver’ which will bring up the window below. On the left hand side it will show the changes on our branch and on the right it will show the branch we are merging from and below will be the end result.

14. There are plenty of options to resolve the conflict. You can either ‘Take Left’ i.e. take all changes in our branch while ignoring the changes in the merging branch or ‘Take Right’ in which case all changes in your branch will be lost and everything in the merging branch will taken. The other option is to manually edit the ‘Working Tree’ pane below both windows. In case you want to have both changes then this is the only way. In this example I want both changes so I will edit the ‘Working Tree’ pane and remove the ‘<<<<<<<<<HEAD’, ‘=============’ AND ‘>>>>>>>>>>> origin/feature’ tags and click on ‘Save’ button. You have to stage this file to resolve it’s conflict status and hence click on ‘Stage’ in the next dialog box.
15. Now click on ‘GitTestMain.java’ in the ‘Files’ pane and click on ‘Commit’ button in the toolbar. You will see comments have been entered for you by SmartGit. Now click on the ‘Commit’ button(not on the ‘Commit and Push’ button).
16. Next select GitTestMain.java and click on the ‘Log’ button in the toolbar. You will see a window like below. You will now notice that there are four lines. The first one shows a green triangle and master which means that we are currently on the master branch. Below that is ‘origin/master’ which means that the changes in our local ‘master’ branch has not been pushed to the remote branch ‘origin/master’. Below that is the feature branch from where we merged into our local master branch. Below the ‘Commits’ pane is the ‘Changes’ pane. Clicking on any one of the lines in the ‘Commits’ pane will display that change that had been done in that commit. However, if you multi-select two lines it will show the changes between those two commits. You will also see a pink line from the feature branch to the master branch which means that the changes in the feature branch is now in the master branch.

17. Close the ‘Log’ window and go back to the main SmartGit Window. In the ‘Pushable Commits’ pane in the bottom left there should be one entry which is the last commit we had done to our local branch but not pushed to our remote repo. Right click on that and click ‘Push Commits’. In the next dialog box click ‘Push’. Select GitTestMain.java in the ‘Files’ pane and click on the ‘Log’ button in the toolbar. You will now see that the origin/master branch
in the previous diagram has moved up to the first line which is because of the push we done from our local master branch to the remote repo.


Excellent…helpful.